What Do the Numbers on a Golf Simulator Mean?
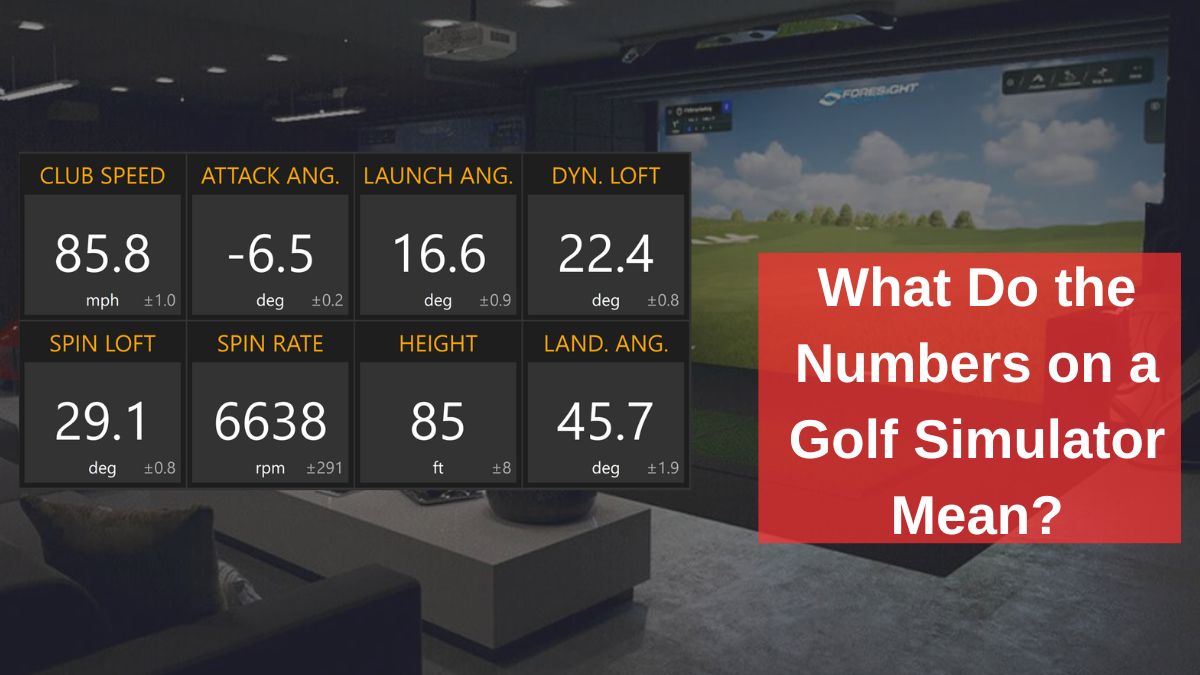
Golf simulators are a golfer’s best friend when it comes to practicing without leaving the comfort of home. We’ve used them, loved them, and they’ve transformed our understanding of our game. But when you first step into a simulator, the numbers can look like a jumbled mess. Launch angle, spin rate, ball speed – what do they all mean?
Let’s break it down, in simple terms, and more importantly, explain how these numbers can help you improve your swing and overall game.
What Do The Numbers On a Golf Simulator Mean?
| Metric | Purpose | Why It’s Important |
|---|---|---|
| Ball Speed | Measures shot power and contact quality. | More ball speed = longer shots. |
| Launch Angle | Determines shot height and distance. | Optimizes distance and accuracy. |
| Spin Rate | Controls shot distance and accuracy. | Reduces hooks, and slices, and improves control. |
| Clubhead Speed | Affects shot power and distance. | Faster speed = longer shots. |
| Carry Distance | Shows how far the ball flies before landing. | Aids in better club selection. |
| Smash Factor | Measures energy transfer efficiency. | Higher factor = maximum distance. |
| Total Distance | Combines carry and roll distance. | Helps plan shots around the terrain. |
| Attack Angle | Impacts shot launch and spin. | Improves drive distance and control. |
| Swing Path | Tracks club movement for accuracy. | Leads to straighter shots. |
| Face Angle | Affects shot direction and shape. | Ensures straighter, consistent shots. |
| Apex Height | Measures maximum shot height. | Helps control shot trajectory. |
| Side Angle | Shows ball direction off the clubface. | Corrects hooks and slices. |
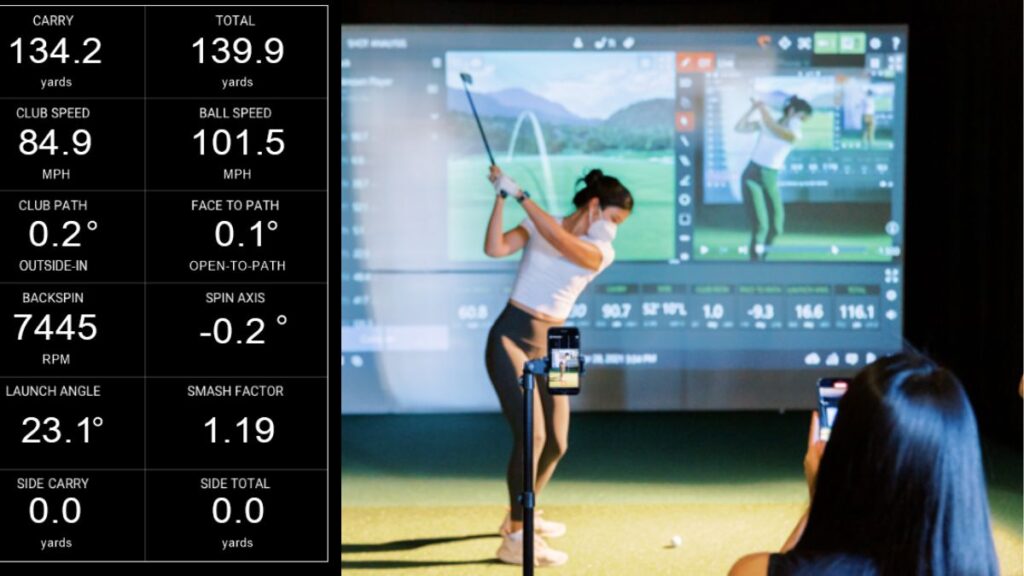
1. Ball Speed
The first number we always look at is Ball Speed. It’s exactly what it sounds like – the speed of the golf ball as soon as it leaves the clubface.
We found that understanding ball speed is key to gauging the power of your shot. If you’re consistently hitting with high ball speed, you’re generating solid power. We loved the fact that this is a simple indicator of how well we’re transferring energy from our swing to the ball.
Higher ball speed means longer drives, period. But it also clues us in on whether we’re making clean contact with the ball. If your ball speed drops, it’s likely due to poor contact or a mishit, which helps us adjust our swing for better accuracy.
2. Launch Angle
Launch Angle is another crucial stat that a golf simulator provides. This is the angle at which the ball takes off from the ground after you hit it.
Our experience showed us that launch angle directly impacts how far and high your ball will travel. Too low, and the ball struggles to gain air; too high, and it becomes a short blooper. We noticed that dialing in the launch angle gave us more control over trajectory and distance.
Optimizing launch angle leads to a sweet combination of distance and accuracy. With practice, we found the ideal launch angle for different clubs, which improved our game significantly.
3. Spin Rate
Spin rate is the amount of spin the ball has after impact. There are two types of spin to keep in mind: backspin and sidespin. Backspin keeps the ball in the air longer, while sidespin causes hooks or slices.
We found that understanding spin rate helps control both distance and accuracy. Too much backspin, and your ball balloons in the air, costing you distance. On the other hand, controlling sidespin eliminates those frustrating slices or hooks.
Knowing how much spin you’re putting on the ball is crucial for perfecting your drives and approach shots. We loved being able to fine-tune our spin for maximum control and consistency.
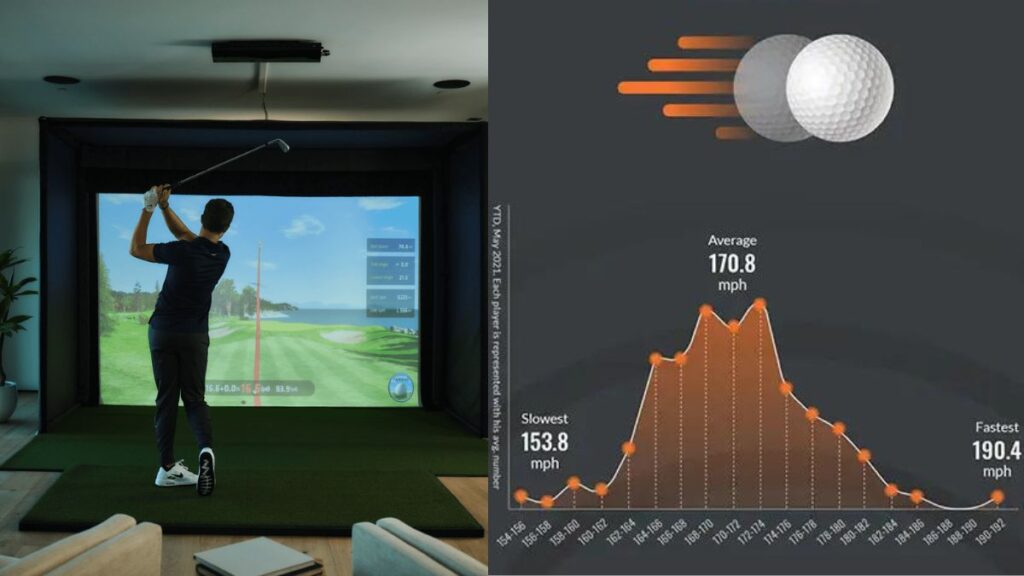
4. Clubhead Speed
Clubhead Speed refers to how fast the club is moving when it strikes the ball. This is one of the core numbers to monitor, as faster clubhead speed generally leads to more power, and consequently, more distance.
We realized that increasing clubhead speed was key to hitting longer drives. However, the simulator showed us that speed without control can lead to errant shots. We loved how the simulator highlighted the balance between speed and technique.
Faster clubhead speed equals more distance, but consistency is key. The numbers helped us balance speed with accuracy, so we could achieve both power and precision in our shots.
5. Carry Distance
Carry Distance tells us how far the ball travels through the air before it hits the ground. This is especially useful for those of us trying to improve our club selection and distance control.
When we started using the simulator, we focused heavily on carry distance because it’s a true reflection of how far you’re driving the ball. We loved how easy it was to test different clubs and shots, improving our confidence in club selection.
Understanding your carry distance helps you make smarter decisions on the course. It takes the guesswork out of club choice, so you can rely on numbers rather than gut instinct.
6. Smash Factor
The smash factor is the ratio between ball speed and clubhead speed. Essentially, it tells us how efficiently energy is being transferred from the club to the ball.
We learned that a high smash factor indicates that we’re hitting the ball with maximum efficiency. We loved this stat because it’s a quick way to gauge how well we’re hitting each shot, helping us tweak our swing for optimal results.
A higher smash factor means you’re getting the most out of your swing. It’s like a power meter – the better your smash factor, the more distance you’ll achieve with the same amount of effort.
7. Total Distance
Total Distance combines carry distance and roll distance, showing how far your ball travels in total after hitting the ground and rolling. This number is important for planning shots on the course, especially when obstacles or different terrain come into play.
We used total distance to measure the overall effectiveness of our drives and approach shots. We loved how the simulator showed us the complete picture, including how different surfaces affect the roll.
Knowing your total distance gives you a strategic advantage on the course. It helps us plan for different conditions and choose the right clubs to navigate challenging layouts.
8. Attack Angle
Attack Angle refers to the angle at which the club hits the ball, whether you’re swinging down or up at impact.
We found that our attack angle had a big impact on launch and spin. We loved using this number to improve our drives, as a positive attack angle generally leads to higher launch and more distance.
By optimizing the attack angle, you can hit higher, longer drives. This number helped us refine our swing mechanics, especially with drivers, to achieve more consistent and powerful results.
9. Swing Path
Swing path measures whether your club is traveling inside-out, outside-in, or perfectly straight through impact.
We found that correcting our swing path led to a huge improvement in accuracy. We loved how the simulator showed us real-time data on our swing, helping us straighten out our shots and avoid that dreaded slice.
A better swing path leads to straighter, more accurate shots. By using this number, we managed to correct our swing faults and saw immediate improvements in our consistency.
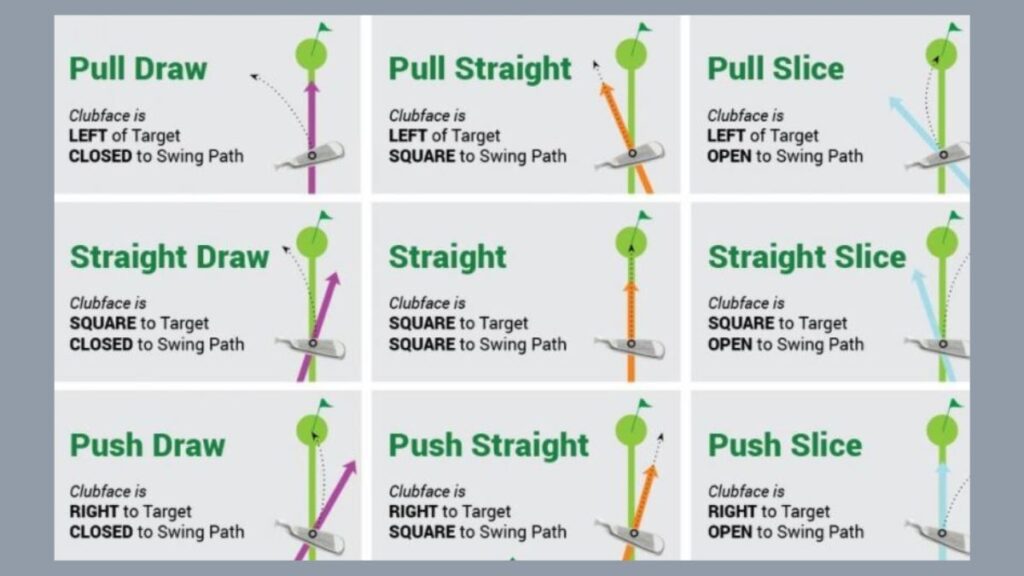
10. Face Angle – Open, Closed, or Neutral?
Face Angle measures whether your clubface is open, closed, or neutral at impact.
We used this number to understand how face angle affects our shot shape. We loved how the simulator helped us tweak our setup to ensure a square face at impact, which reduced our slices and hooks.
A square clubface leads to straighter shots. By dialing in our face angle, we were able to hit more consistent, accurate shots on the course.
11. Apex Height – How High Is Your Shot?
Apex height measures the maximum height your ball reaches during flight. While it may not seem as crucial as other numbers, it’s important for understanding your shot’s trajectory and distance.
We used apex height to fine-tune our shots, especially when dealing with wind conditions or aiming for specific distances. We loved seeing the real-time feedback on how high our ball was flying and adjusting our technique accordingly.
Knowing your apex height helps you control your trajectory, which is especially useful when trying to land the ball softly on the green or avoid wind interference.
12. Side Angle – Where’s the Ball Heading?
The side angle tells us if our ball is veering left or right off the clubface. This is often the cause of a hook, slice, or perfectly straight shot.
We loved how the simulator showed us exactly where we were going wrong with the side angle, helping us make adjustments to keep the ball on the fairway.
Correcting side angle leads to straighter, more accurate shots. By using this feedback, we could fix our alignment and swing path, which improved our consistency.
Final Advice – Mastering the Numbers for a Better Game
Golf simulators give us the numbers, but it’s up to us to interpret them and make improvements. From ball speed to spin rate, each number tells a part of the story. When we began to understand these stats, our game dramatically improved.
We loved how these insights allowed us to tweak our swing, optimize our clubs, and ultimately play smarter on the course.
The next time you fire up a simulator, don’t just hit balls. Pay attention to the numbers, because they can help you fine-tune your technique and take your game to the next level. We’ve seen the difference it makes – now it’s your turn to experience it!
You May Also Like Reading:
- 10 Must-Have Indoor Golf Accessories Guide
- Are There Special Balls For A Golf Simulator?
- How To Identify The Cost Of A Golf Simulator
- How To Setup Best Golf Simulator Enclosure Size
- How To Start A Golf Simulator Business
- What Is A Golf Simulator?
- How Realistic Is A Golf Simulator?
- Beginner’s Guide To Using A Golf Simulator
- Golf Simulator Vs. Golf Launch Monitor
- Golf Simulator Hitting Mat Guide
- Golf Simulator Projector Setup
- Home Golf Simulator Design Ideas

I’m Khawar Iqbal, Founder of Golfsportal. I’m excited to be your guide in the world of Golf. At Golfsportal, I will keep you updated with insightful information that will help you improve your golfing experience and knowledge about what’s currently happening in the industry.